Minecraft's vanilla terrain is charming, but eventually, you crave something... more. Something truly epic. That's where world generation mods come in, transforming your blocky landscapes into breathtaking vistas of towering mountains, sprawling canyons, and alien biomes. But diving into the world of custom terrain isn't always a smooth journey. Getting the installation and management of world gen mods right is the difference between an unforgettable adventure and a frustrating crash-to-desktop loop.
Consider this your definitive guide – a seasoned explorer's map to navigating the often-complex terrain of modded Minecraft generation. We'll equip you with the knowledge and confidence to not just install these game-changing additions but also manage them like a pro.
At a Glance: Key Takeaways for World Gen Mods
- Backup First, Always: Before any modding, save your existing worlds!
- Version Match is Crucial: Mods must match your Minecraft and mod loader versions exactly.
- Mod Loaders (Fabric/Forge): Understand which one your chosen mods require and install it first.
- Mods vs. Datapacks: Know the difference; datapacks are generally simpler to install.
- Compatibility Matters: Some world gen mods play better together than others (e.g., Terralith with Biomes O' Plenty).
- New Worlds Recommended: Most world gen mods shine brightest on fresh worlds to avoid chunk border issues.
- Allocate More RAM: Custom terrain often demands more memory from your system.
- Troubleshooting: Learn to read crash reports and use the "binary search" method to find conflicts.
Why Bother with World Gen Mods? Elevating Your Minecraft Experience
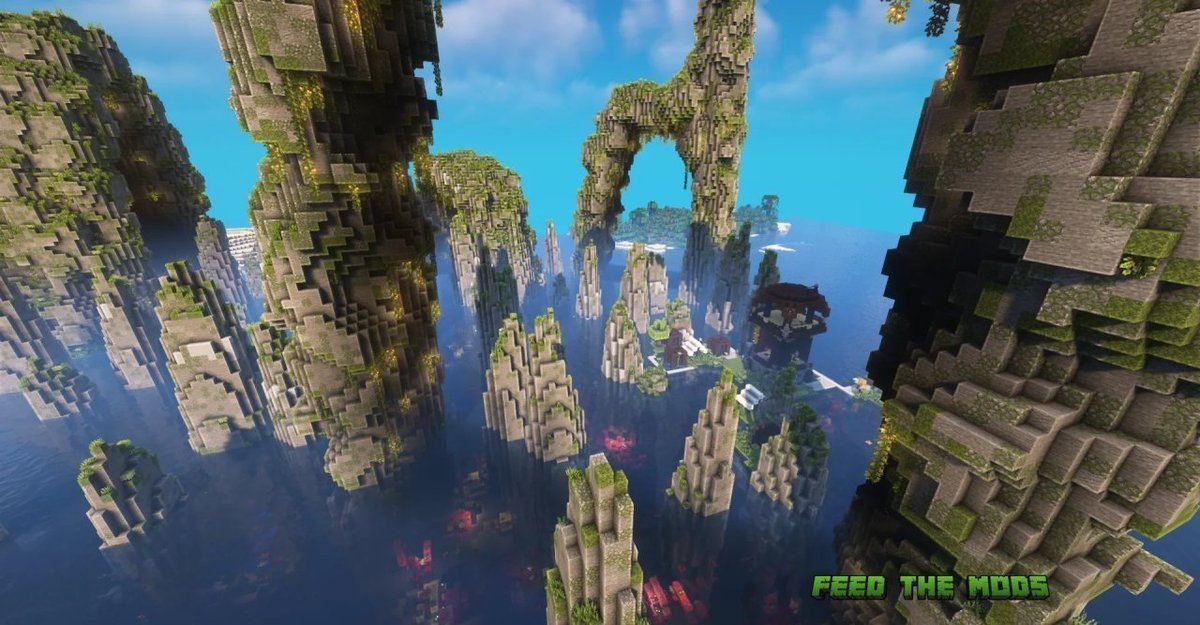
Imagine cresting a hill to see a horizon-spanning mountain range, soaring above y-300, crafted with geological precision. Or descending into a vibrant cave biome, unlike anything vanilla Minecraft offers. This isn't just theory; it's the reality crafted by mods like Tectonic, which builds colossal, evolving mountain ranges, or Terralith 2.0, introducing nearly 100 new biomes from Yellowstone-inspired geysers to dramatic floating islands and deep ocean trenches.
These aren't just aesthetic tweaks; they fundamentally change how you explore, build, and survive. From the "bold natural landscapes with enormous mountains soaring nearly 2000 blocks high" promised by JJThunder To The Max to the subtle environmental details like fallen trees and boulders added by Geophilic, world gen mods redefine your game world. Paired with shaders, these altered landscapes transform into truly cinematic vistas with dramatic lighting and alive cavern networks, making every journey an epic event. To dive deeper into what's available, you might want to start by exploring the best world generation mods out there.
Understanding the Landscape: Mods vs. Datapacks, Fabric vs. Forge
Before you start downloading, it's essential to grasp a few core distinctions in the Minecraft modding ecosystem.
Mods: The Heavy Lifters
Traditional mods (like most listed in our introduction) are standalone programs that fundamentally alter Minecraft's code. They can add new blocks, items, creatures, and, in our case, rewrite how the world generates. They require a "mod loader" to run.
Datapacks: Lighter-Touch Customization
Datapacks are a more vanilla-friendly way to customize your game. They use Minecraft's built-in data-driven features to add new recipes, advancements, loot tables, and even alter world generation (though typically to a less extreme degree than a full mod). Many powerful world gen options, such as Terralith 2.0 and Nullscape (which transforms The End), are available as datapacks, sometimes even working on a vanilla client! They don't require a mod loader.
Mod Loaders: Fabric vs. Forge
These are the frameworks that allow mods to run. Think of them as operating systems for your mods.
- Forge: The long-standing veteran. It's robust and has a massive library of mods. Many classic and larger content mods are Forge-based.
- Fabric: A newer, lightweight, and often faster alternative. It's popular for optimization mods and many modern world gen projects, including Tectonic and Terralith 2.0.
Why it matters: A mod built for Forge won't work on Fabric, and vice-versa. You must know which loader your desired world gen mod uses before proceeding.
Preparation is Key: Laying the Groundwork for Modded Worlds
Don't skip these critical steps. They save you headaches down the line.
1. Back Up Your Saves (Seriously, Do It Now!)
This is non-negotiable. Modding can corrupt worlds. Copy your entire saves folder (found in your .minecraft directory) to a safe location. If things go wrong, you'll thank yourself.
2. Match Your Minecraft Version Exactly
If you're playing Minecraft 1.20.1, your mod loader and all your mods must be for 1.20.1. A 1.19 mod won't work on 1.20, and trying to mix them is a recipe for instant crashes. This is especially true for world gen mods, which interact deeply with version-specific generation code.
3. Install the Correct Mod Loader (Fabric or Forge)
- Download the Installer: Visit the official Fabricmc.net or Files.Minecraftforge.net website.
- Select Your Version: Choose the installer that matches your Minecraft version.
- Run the Installer: Execute the
.jarfile you downloaded. This will create a new profile in your Minecraft Launcher. - Launch Minecraft Once: Select the newly created Fabric or Forge profile in your launcher and run the game. Let it load to the main menu and then close it. This generates the necessary
modsfolder in your.minecraftdirectory.
4. Allocate More RAM to Minecraft
World gen mods, especially those that generate vast and complex landscapes like Regions Unexplored or Larion World Generation, can be memory-intensive.
- Open your Minecraft Launcher.
- Go to the "Installations" tab.
- Hover over your Fabric or Forge profile and click the three dots (
...). - Select "Edit."
- Click "More Options."
- Find "JVM Arguments." The default usually looks like
-Xmx2G(meaning 2 Gigabytes of RAM). Change this to-Xmx4Gor-Xmx6G(4GB or 6GB), depending on your system's total RAM. Never allocate more than half of your system's RAM.
The Installation Playbook: Step-by-Step for World Gen Mods
You've prepped your system; now it's time to bring those epic landscapes to life.
1. Finding Your Mods: Where to Hunt for Wonders
The two primary hubs for Minecraft mods are:
- CurseForge: The largest and most popular modding platform. Most world gen mods, including Biomes O' Plenty and Regions Unexplored, have their main pages here.
- Modrinth: A newer, rapidly growing platform known for its user-friendly interface and focus on modern versions, especially Fabric. Many newer mods, like Tectonic and Nullscape, can be found here.
When searching, use keywords like "world generation," "biome," "terrain," or specific mod names. Always check the "Versions" tab on a mod's page to confirm compatibility with your Minecraft version and chosen mod loader.
2. Downloading Smart: Verify and Read
- Always Download from Official Sources: Stick to CurseForge, Modrinth, or the mod developer's official website. Avoid shady third-party sites.
- Check File Name: Ensure the downloaded
.jarfile clearly states the Minecraft version it's for. - Read the Description: The mod page will tell you if it's Forge or Fabric, if it requires additional dependencies (like the Fabric API for Fabric mods), and any known incompatibilities. For instance, Nature's Spirit might list specific requirements for its unique materials like Kaolin clay.
3. Putting Mods in Place: The mods Folder
Once downloaded, installation is usually as simple as dragging a file.
- Locate Your
.minecraftFolder:
- Windows: Press
Win + R, type%appdata%, and press Enter. Open the.minecraftfolder. - macOS: Open Finder, press
Cmd + Shift + G, type~/Library/Application Support/minecraft, and press Enter. - Linux: Often found at
~/.minecraft.
- Find the
modsFolder: Inside.minecraft, you should see a folder namedmods. If you don't, ensure you ran your mod loader (Fabric/Forge) at least once after installation. - Drag and Drop: Place the downloaded
.jarfiles (for your world gen mods and any dependencies) directly into themodsfolder.
- Fabric Specific: Many Fabric mods, including Terralith 2.0 if you're using the mod version, require the Fabric API. Download the correct version of Fabric API and place its
.jarin yourmodsfolder as well.
4. Datapacks: A Simpler Approach
If your chosen world gen enhancement is a datapack (like the datapack version of Terralith 2.0 or Nullscape):
- Create a New World: Start creating a new world in Minecraft.
- Access Datapack Screen: On the "Create New World" screen, click the "Datapacks" button.
- Open Datapack Folder: Click "Open Datapack Folder." This will open a folder specific to this new world.
- Drag and Drop: Place the downloaded datapack
.zipfile (do not unzip it!) into this folder. - Enable Datapack: In the Minecraft UI, the datapack should appear on the "Available" side. Hover over it and click the arrow to move it to the "Selected" side. Ensure it's above any other datapacks that might conflict.
Crafting Your World: Creating a New Save with World Gen Mods
This step is crucial for world gen mods. You can't just slap them onto an existing world and expect seamless results (though some minor changes might apply to newly loaded chunks). For the full experience, always create a new world.
- Launch Minecraft with Modded Profile: Select your Fabric or Forge profile in the launcher and click "Play."
- Create New World: From the main menu, go to "Singleplayer" -> "Create New World."
- World Type Selection:
- For most world gen mods (e.g., Tectonic, Terralith, Biomes O' Plenty, Regions Unexplored), you'll typically leave the "World Type" setting on "Default" or "Amplified." The mod itself will override the generation. Some mods, however, might add their own custom world type to this menu (e.g., Biomes O' Plenty has its own "Biomes O' Plenty" world type). Read the mod's description carefully!
- If using a datapack, ensure it's enabled as per the previous section.
- Seed Considerations: You can use a custom seed, but remember that a modded world will look drastically different from a vanilla world generated with the same seed.
- Game Rules/Cheats: Set these as desired.
- Create! Click "Create New World" and let the magic happen. Initial world loading might take longer than vanilla, especially with complex generation.
Managing Your Modded Wonderland: Best Practices for Stability
Installing is just the first step. Keeping your modded world running smoothly requires ongoing attention.
1. Compatibility Checks: The Silent Killers
Not all world gen mods play nice. While Terralith 2.0 is noted for its compatibility with Biomes O' Plenty and Oh The Biomes You'll Go, others might clash.
- Read Mod Descriptions: Developers often list known incompatibilities.
- Test in Batches: When adding multiple mods, add a few at a time and launch the game to check for stability. If a crash occurs, you'll know one of the newly added mods is the culprit.
- Prioritize World Gen: If you have multiple major world gen mods, they might try to override each other. Generally, pick one primary world generator (like Tectonic or Terralith) and then add smaller, complementary mods (like Geophilic for details) or biome additions that specifically state compatibility (like Regions Unexplored if it's designed to integrate).
2. Load Order (Less Critical for World Gen, but Good to Know)
For some mod types, the order in which they load can matter. For world generation, it's less frequently an issue because the primary generator often takes precedence. However, if you're dealing with very specific biome integration mods, sometimes higher-priority mods (alphabetically or based on an internal system) might override others. This is rarely something you manually configure; it's more about knowing that if two mods should work together but don't, load order could be a factor.
3. Performance Optimization: Keeping Frames High
Even with increased RAM, complex world gen can hit your FPS.
- Graphics Settings: Experiment with reducing render distance, fast graphics, turning off clouds, and reducing particle effects.
- Optimization Mods: Consider adding performance-boosting mods like Lithium (Fabric), Phosphor (Fabric), or OptiFine (Forge/Fabric) – though be careful with OptiFine and ensure it's compatible with your other mods.
- Regular Chunk Loading: Minecraft continuously generates and loads chunks. If you're exploring rapidly, your system might struggle to keep up. Take breaks or reduce exploration speed in demanding areas.
4. Keeping Mods Updated: Stay Current, Stay Safe
Mod developers regularly release updates for bug fixes, performance improvements, and new Minecraft versions.
- Check Mod Pages: Periodically visit the CurseForge or Modrinth pages for your installed mods.
- Replace Old Files: To update, download the new
.jarfile and replace the old one in yourmodsfolder. Always make sure the new version matches your current Minecraft version.
5. Dealing with "Irregular Chunk Borders"
This is a common pitfall, especially if you add a major world gen mod like Larion World Generation to an existing world. If you travel into new, ungenerated chunks, the new mod's terrain will suddenly begin, creating a jarring, straight line where the old and new generation schemes meet.
- Best Solution: New World: For mods that overhaul terrain contours and biome layouts, starting a fresh world is almost always the best approach to ensure seamless generation from
0,0. - Border Repair Tools (Advanced): For existing worlds, tools like WorldEdit or region-specific pruning utilities can sometimes "reset" chunks beyond a certain radius, allowing the new generator to take over smoothly, but this is an advanced technique and requires caution.
Troubleshooting Common Woes: When Things Go Sideways
Even seasoned modders encounter issues. Here's how to tackle the most frequent problems.
"Game Crashed!" on Startup or World Loading
This is the most common issue.
- Read the Crash Report: When your game crashes, it generates a
crash-report-...txtfile in your.minecraftfolder. Open it. Look for keywords like "Caused by:" or "at" lines that point to a specific mod. - Mod Version Mismatch: Did you download a mod for the wrong Minecraft version or mod loader? Double-check all your mods.
- Dependency Missing: Did a Fabric mod require Fabric API, and you forgot to install it?
- Conflicting Mods: This is the trickiest.
- Binary Search Method: Remove half of your mods from the
modsfolder. Launch the game. - If it crashes, the culprit is in the half you left in. If it works, the culprit is in the half you removed.
- Repeat this process, halving the problematic group each time, until you isolate the single conflicting mod.
Missing Biomes or Features
You installed a mod, but the world looks vanilla, or features aren't appearing.
- World Type Selection: Did you select the correct world type when creating the new world? (Often "Default" is fine, but some mods add their own).
- Datapack Enabled: If using a datapack, ensure it's enabled on the "Create New World" screen.
- New Chunks: Are you exploring truly new, ungenerated chunks? Existing chunks won't change.
- Compatibility: Does this mod conflict with another world gen mod you have installed? Some mods might silently override others without crashing.
Low FPS / Lag Spikes
World gen mods, especially those adding immense terrain or dense vegetation (like Geophilic's detailed environments or Regions Unexplored's lush forests), can be taxing.
- Allocate More RAM: Revisit this step and ensure you've given Minecraft enough memory.
- Graphics Settings: Reduce render distance, fast graphics, disable fancy effects.
- Optimization Mods: Add client-side performance mods if you haven't already.
- Check CPU Usage: Open Task Manager (Windows) or Activity Monitor (macOS). If Minecraft is maxing out a CPU core, your CPU is the bottleneck.
Advanced Tweaks & Configuration (For the Adventurous)
Many complex world generation mods offer configuration files, allowing you to fine-tune their output. Tectonic, for example, is lauded for its "flexible configuration."
- Mod-Specific Configs: After running a modded world once, check the
configfolder within your.minecraftdirectory. Many mods generate.json,.toml, or.cfgfiles here. - Read Mod Documentation: This is where the developer explains what each setting does. You might be able to adjust biome rarity, mountain height limits, or specific feature generation.
- Tweak Cautiously: Make small changes, save the file, and then test in-game. Always back up the original config file before making extensive changes.
Beyond Vanilla: Elevating Aesthetics with Shaders & Resource Packs
Once you have your dream world generated, don't stop there. Shaders and high-resolution resource packs are the perfect companions to enhance the visual splendor.
- Shaders: Programs like OptiFine or Iris/Sodium (for Fabric) allow you to install shaders, which overhaul lighting, shadows, water reflections, and weather effects. Imagine the dramatic mountain views from Tectonic or the deep ocean trenches from Terralith illuminated by dynamic lighting – it’s a game-changer.
- Resource Packs: These modify textures, sounds, and models. A resource pack that complements your world gen mod's aesthetic can further immerse you in the custom landscape, ensuring that your newly generated biomes with new materials (like Nature's Spirit's Kaolin clay) look their absolute best.
Your Epic Journey Continues: Maintaining Your Modded World
Installing and managing world gen mods transforms Minecraft into an entirely new experience. It opens doors to worlds far beyond anything vanilla could offer, from the fantastical realms of Larion World Generation to the shattered expanses of Nullscape's End.
Remember, this is an ongoing process. Regularly back up your worlds, stay informed about mod updates, and troubleshoot systematically. With a little patience and the knowledge from this guide, you'll be conquering custom peaks, exploring hidden biomes, and building in landscapes you once only dreamed of. Happy exploring!